Showing posts with label DIY. Show all posts

Saturday, August 16, 2014

Baby Tee Refashion

Another top secret project I can finally reveal: a baby shower gift! When I first moved to Atlanta I had a hard time making friends and was getting pretty lonely until I stumbled on the Geek Girls of North Atlanta. It sounds a little junior high and cliquish, a grown-ass woman belonging to a club, but it's a really awesome group of ladies and open to anyone.

So anyway, last year we had tee shirts made for DragonCon and I ordered mine based on the bust size and it ended up being uncomfortably tight in the shoulders. You know, that awful, digging in  your armpits feeling? Ugh, it's my RTW bugaboo as a tall, small busted lady. I only wore it once and it languished in my closet until I heard my friend Lisa was having a little girl. Well, our newest (and tiniest) Geek Girl was going to need a shirt too, so I made her one!


I used this free pattern, only I left off the skirt portion and did a smaller hem with my twin needle. I followed the directions exactly and it was a pretty quick make, just a couple of hours. I struggle a bit with the arm bands because my jersey didn't have much stretch. In retrospect I probably should have just recut longer bands instead of fighting the fabric. You can see a little bit of puckering because this. I'm hoping the baby will be so squirmy and adorable no one will notice.

This is the original shirt:


This would have been plenty of fabric, except there was a flirty slogan on the back and it felt skeevy to sexualize an infant. Plus the font was way too big to fit on a baby-sized shirt.


However, in a bit of sewing serendipity I still can't get over, my husband went to an event at work and came home with a shirt by the same company using the same fabric in the same color. He couldn't resist my sky-high enthusiasm for this project (seriously, this has been so hard to keep a secret!), and let me cut up his new shirt.  This was fate, I explained, and one does not anger the sewing gods or they will smite you by breaking the upper looper thread in your serger.


The rest was cake. I traced the pattern onto the front to make sure the design was centered and the text was straight, and then sewed it all up in a jiffy.


I didn't finish the side or shoulder seams because I read somewhere that serger finishes can be rough on on a baby's delicate skin. It's so tiny and adorable I can hardly stand it.


As tiny as this is, somehow, impossibly, it won't fit until next spring or summer, but I had to go with a bigger size to fit the graphic. It's for the best though, because by then, our newest Geek Girl will be a little less hungry and sleepy and ready to take on some geeky adventures.

Sunday, June 9, 2013

DIY Tufted Headboard

Hello again! Three weekends, 3 trips crafts and hardware stores, 6 episodes of Oddities, and many podcasts later, I have finished my new headboard!


I leaned heavily on the tutorial over at Little Green Notebook, which suggests using a large sheet of pegboard as the base. It's a pretty genius idea, but my husband and I both drive tiny cars and there is no way something that large was going to fit. (Sidebar: Tiny cars are the best! Mine gets great gas mileage and I can squeeze into the narrowest parking spaces.) So I decided to go big and build a proper frame. I even drew up a sketch with measurements for our queen sized bed.


When Brian and I went to the hardware store, we had no idea what kinds of screws to use to hold this all together, but the employee who helped us was super nice. I think it helped that we were totally upfront with about how completely over our heads we were and the three of us had a good laugh. He told us many people come in with a vague idea but no diagram, so we were already off to a good start! He suggested we use these corner brackets to hold the frame together, and it worked like a charm.


Brian showed me how to use the drill, and I took over from there. Within a couple of hours, I had put this together:


Next, I plotted out where I wanted to put the tufts (using my fabric covered buttons) on the front of the board using chalk, and then transferred the markings to the backside of the board.


Next, I attached 2" foam from Joann's using spray glue. The foam is one of the most expensive components, so I waited until it was on sale and I had one of those 15% off your entire purchase coupons. Also, I recommend getting medium or heavywight bonding spray glue. I was feeling cheap and bought the less expensive lightweight bonding can, but it wasn't strong enough and the foam fell off within a couple of hours.


After that dried, I put down a layer of high loft quilting batting, and then the fabric on top. I used 2 yards of Beige linen from Gray Lines Linen's Warsa Line. It is the linen used in the Little Green Notebook tutorial, and they even sent an adorable hand-written packing slip. According to the tutorial, you thread a needle with heavy-duty thread, push it through from the backside, add a button, push the needle and thread back through the foam, pull as taut as you can, and staple gun the whole thing in place.


This is about the point where I ran into some serious problems. The upholstery needles I bought were maybe 1 1/2" long, and so I was having a hard time pushing through the foam at a straight angle. Additionally, the thread I was using was too thin for the staples to catch. I wish I had taken a picture, but basically the buttons were just sitting on top of the fabric in a wobbly line. It looked like a drunk person had been working on it. And at that point I was so frustrated I could have used a drink.

Before I resigned myself to submitting this to CraftFail, I made an emergency trip to Hancock Fabric, where I bought thicker embroidery thread (in retrospect I wish I had bought something more akin to twine) and 5" needles meant for making dolls.


These things totally saved the day! I still had to make sure everything was lining up, but it was looking much better. By the end of weekend two, I had gotten this far:


Starting from the center and working outwards, I just kept chugging along. The buttons kept coming apart as I was pulling the thread taut, so I eventually just gave up and glue-gunned them on at the end. When I was finished, I pulled the edges of the fabric taut and staple gunned it in place from the back, then trimmed the excess fabric.


And from the front:

And its new home in my bedroom!


I got the comforter on sale from West Elm pretty recently, but the room still seemed a little bare, which is what started this whole crazy thing.


All told, I'd say I put in about $100 in materials and 25 hours in time. I'm not sure I want to build any more furniture any time soon, but I'm happy with out it came out. I'm excited to wrap this up and move on to Karen of Did You Make That's Pyjama Party.

Sunday, March 10, 2013

Sewing, Interrupted

Hello again! I finally crawled out from under my rock a couple of weeks ago and bought the Sewaholic Renfrew top. With all the rave reviews, I figure I can't go too far wrong even if I am a newb when it comes to knits. I cut everything out last Saturday, and was planning to sew it up this weekend after I picked up a ballpoint twin needle. I know Tasia recommends securing the collar band with a zigzag stitch, but I've seen such fabulous, professional results around the blogosphere with a twin needle, I'd like to try it out.


Two fabric stores later, I couldn't find one and ended up ordering it on Ebay. It's frustrating because I live in a major city - Atlanta can host the Olympics but doesn't have a store with a decent selection of notions?!

So, instead of sewing this weekend like I planned, I've been working on other crafty projects. First up, Brian and I are going to attempt to make a headboard. I like this one from West Elm a lot, but I also like saving money and tackling a challenge (in this case, power tools). So I'm adapting this tutorial by Little Green Notebook, and one of the steps is making fabric covered buttons:


It turns out making buttons is a lot more physically demanding than you would think. I made about two dozen last weekend and by the time I finished I had tired arms and blistered fingers! I'm getting much better at it as I go along, so when this is all over I think I'll experiment with making earrings out of my stash of fabric scraps.

The other project I've been working on is my Ms. Barbie Goes to Washington outfit, and it has been an uphill battle. And, as usual, it's my own doing! :) I fell in love with this ridiculous sparkly yarn, but it is sport weight and the pattern calls for fingering. I figured I could make it work. Well, what I've ended up with is a oversized jacked and a very tight skirt:


I'm not sure how I'm going to fix this one yet. The sad part is that these two pieces aren't even my first attempt. This suit is going into hibernation for at least a couple of days because I'm starting to get frustrated. Who knew fitting Barbie would be as hard as a real woman?

This weekend I also took the sewing delay and the warmer weather (it hit 65 today!) as I sign I should get some spring cleaning over and done with. But not without rewards! I just whipped up these no flour, no butter, peanut butter oatmeal chocolate chip cookies by Ambtious Kitchen. Delicious and healthy-ish.

Saturday, February 2, 2013

January sewing

Hello again! I am absolutely LOVING my new Viking. It is such a dream to sew on that I feel like a big portion of my past sewing struggles can be blamed on my old machine. I know, I know, a poor workman blames his tools. Still, it is much easier to get nice results when the tension doesn't suddenly give out halfway through a seam, you know?

My first project of 2013 was a fun one - a disco costume for a friend's themed birthday party.


The party was the weekend after New Years and sort of snuck up on me. After a bit of online research, I decided the quickest and easiest route was to make extreme bell-bottoms to go over my green skinny jeans. I headed over to a shopping plaza nearby that has a thrift store and a fabric store, and I figured between the two I could put something together. Lucky for me, everything was half off at the thrift store the day I went, so I got that shiny silver shirt for $2.50 and then walked over to Hancock, where I bought a yard of this spectacularly tacky snakeskin fabric for $4. Success!


s

This kind of mystery lamé fabric would have been a nightmare to sew on my old machine, but the Viking took it like a champ. I didn't have a whole lot of time to make these up, so I cheated here and there. I didn't make a proper casing for the elastic, finish any seams, or hem them. I figured it just needed to hold up for one night!


Funny story: I shopped in Joann's Fabric wearing this costume. Seriously. There are no Joann's ITP (inside the perimeter), so I try and wait until I'm already heading out to the suburbs instead of making special trips. I needed buttons and stuffing pretty badly, so I decided to throw pride to the wind and stop in anyway. I did take off the snakeskin bell-bottoms, but I still looked plenty strange with my shiny shirt, headband and heavy lavender eye shadow. The side-eyes were totally worth it though: I got my supplies, my costume was a hit at the party and I had a really great time.


My second project this month was a set of draft snakes to help insulate the sunroom a little better. Between the three large windows and the sliding glass door, it's pretty drafty. I am a total wuss when it comes to the cold, and so I wanted to make the room a little more comfortable for sewing. Plus, I love any excuse to break out the rotary cutter.


I used one of my 25 cent remnants in my stash from my trip to Fabric World. It was all straight seams and took no time at all. Stuffing, on the other hand, took what felt like forever. Like, a movie and 3 episodes of Felicity on Netflix over the course of several days. Totally worth the drudgery though - the draft snakes have helped keep the room warmer, and I'm pretty happy with the snug fit, considering the height and depth measurements were mostly guesswork.


Next up is the Lisette Market Blouse (Simplicity 2211)! I'm taking my fear of sleeves head on.


Tuesday, April 10, 2012

Jewelry Organization

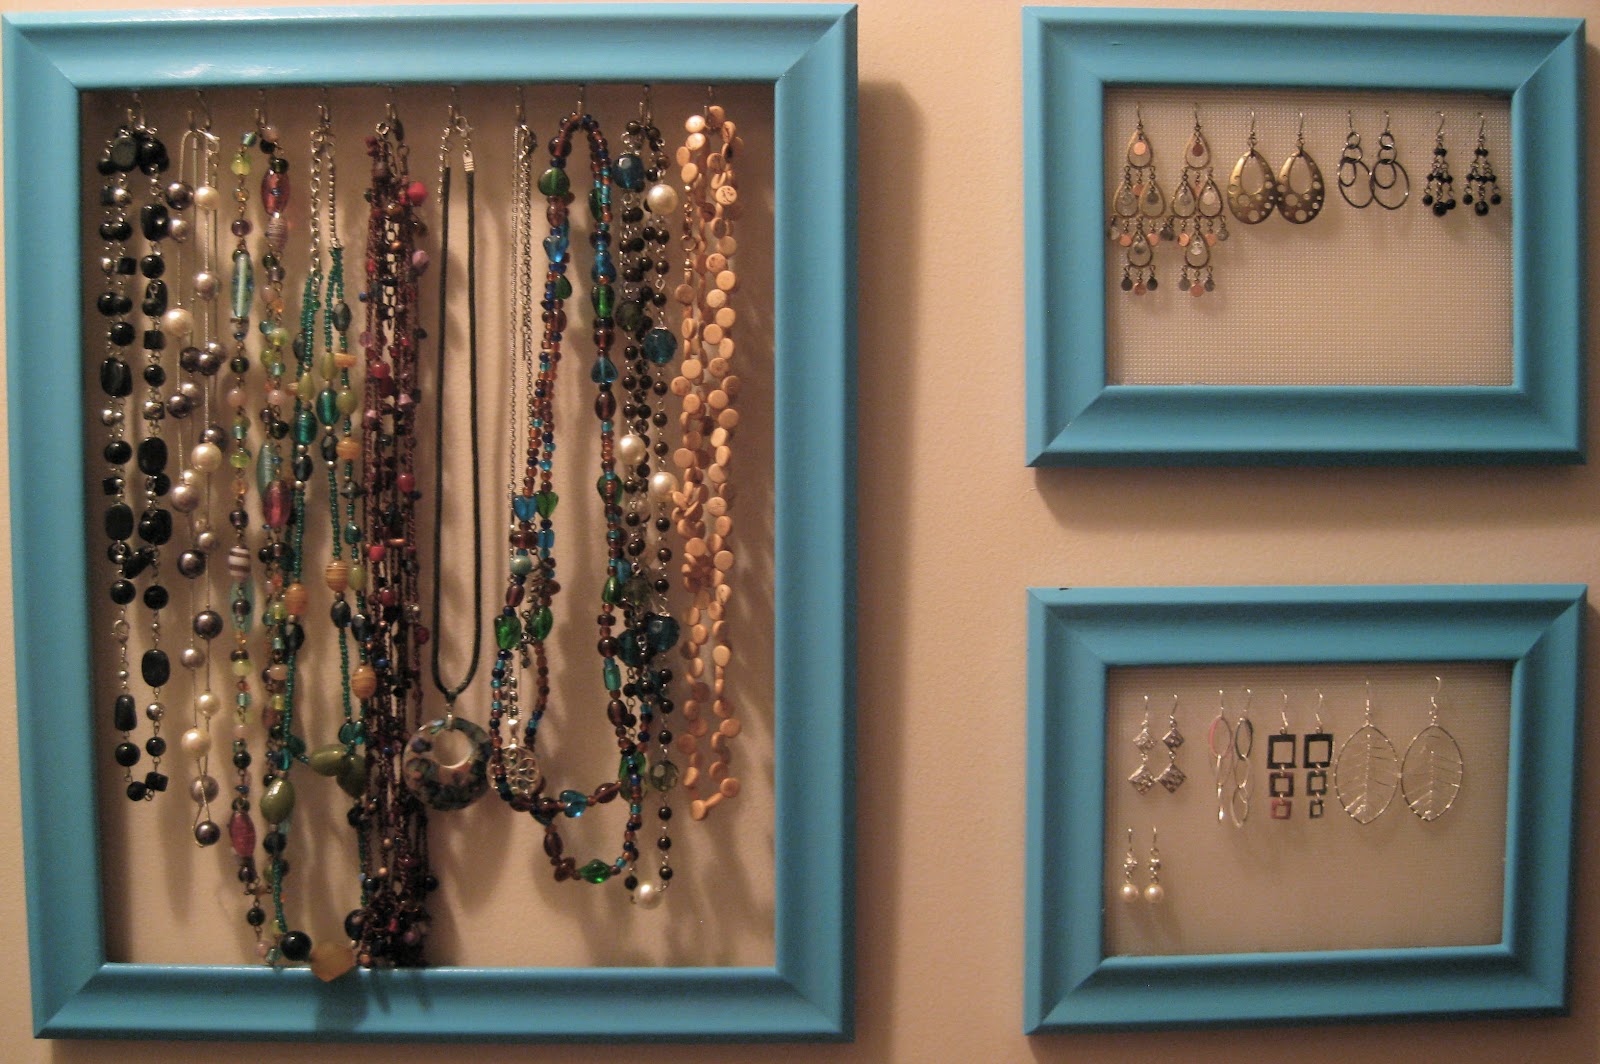
Jewelry organizers were all the rage on Pintrest a couple of months ago, a fun way to merge pretty with practical. I immediately latched on to this idea, having a complete "duh!" moment. My old system was to pile all of my jewelry on my dresser and then pick it up off of the floor in the morning after my cat's nocturnal adventures. Seriously. I did this for months. Like I said, duh.

Sidenote - I present this as evidence that Pippin delights in knocking things over:


Anyway, I picked up some cheap frames from the dollar store, and some craft paint from Michael's (Martha Stewart's Gloss paint in Pond). The original plan was to display my jewelry in my bedroom, but after Daylight Savings hit it was pitch black in the morning and I started getting dressed in the closet to avoid waking up my husband. So my jewelry needed to move to the closet too.


If could do this again I wouldn't bother with the painting. I don't know whether I should have sanded the frames first or the craft paint was just sucky, but the paint is incredibly easy to chip. In fact, I managed to chip a big chunk off while hanging the frames up, you can see it a little bit on the top left-hand corner of the bottom frame:


I used a glue gun to put in clear plastic cross stitch canvas for the earrings. The canvases come in relatively small sizes, so I had to buy two smaller frames instead of a single 8"x10" as I had originally envisioned. The holes in the cross stitch canvas are the absolute perfect size for earrings, so I'm happy with it.

As for the necklaces, my husband helped me drill holes about an inch apart to screw the hooks into. The first few hooks went in fine, but eventually the wood split, leaving the hooks wobbly. I filled in the empty space using a glue gun, and this made things much more secure.


Once the hooks were in, the frame no longer laid flush against the wall, so I cut a few strips of cardboard out, and glued them against the top part of the frame, essentially projecting the frame out from the wall about half an inch. Then I used velcro hanging strips to secure the frame to the wall. You can see in the picture below that it's mounted at little bit of an angle to allow for the hooks:


Overall, I'm really happy with how this project turned out. I even enjoyed coming up with solutions to the little challenges that cropped up along the way. And, best of all, my jewelry is now safely out of Pippin's reach.